
Club admin quickstart
On this page
This guide takes you from a brand new account to your first booking on the court sheet: create your club, add courts, set your hours, rules, and prices, invite a member, and book a test court.
Plan on about 20 minutes.
Before you start
- An email address you can sign in with. You'll be the club's first Admin.
- A list of your courts, including each court's name, surface (hard or clay), whether it's indoor or outdoor, and whether it's used for tennis, pickleball, or both.
- Your opening hours and hourly court price.
- The email address of one member to invite. A colleague or your own second address works well for a test.
Step 1: Create your club
- Go to app.tennisbook.co/signup.
- If you're not signed in, you'll see Create a club. Select Continue.
- Create your Tennisbook login, or log in if you already have one. Passwords need at least 15 characters.
- On the Create your club screen, check that Signed in as shows the email you want to use. If it doesn't, select Use a different account.
- Enter your Club name, for example Riverside Tennis Club. As you type, Tennisbook shows the club address it will use, for example
riverside-tennis-club.clubs.tennisbook.co. - Check the Time zone. Tennisbook suggests one from your computer. Bookings and schedules use this time zone.
- Select Create club.
Tennisbook opens your new club on the Home page. You're signed in as the club's Admin.
Note: Your club address comes from the club name and can't be changed later. Tennisbook uses lowercase letters and numbers, turns spaces and punctuation into hyphens, and keeps the address to 32 characters. If you see That club address is taken. Try another name., try a variation such as adding your town.
Note: You can't change the time zone in the app after you create the club, so pick the one your club is in. To change it later, contact Tennisbook support.
Your 14-day trial: Creating a club starts a free 14-day trial of the Club plan. A banner at the top of the app shows when it ends. You can choose a plan any time from Settings > Billing.
Step 2: Add your courts
Your club starts with one court section, named after your club, and no courts yet.
- In the sidebar, select Courts.
- Select Add court.
- In the New court dialog, fill in:
- Name: what your staff and members call the court, for example Court 1.
- Section: leave your club's default section selected for now.
- Surface: Hard or Clay.
- Setting: Outdoor or Indoor.
- Sports: check Tennis, Pickleball, or both.
- Select Save. You'll see Court 1 added.
- Repeat for each of your courts.
Tip: If a court has pickleball lines painted over the tennis court, check both Tennis and Pickleball. That makes it a shared court. Members choose a sport when they book, and a booking for either sport holds the whole court. See Add and configure courts.
Step 3: Set your club hours
New clubs are open from 6:00 AM to 10:00 PM. If your hours are different, change them now.
- Select Settings (the gear at the bottom of the sidebar), then select Club.
- Under Hours, choose Opens and Closes.
- Select Save. You'll see Club hours saved.
See Set your club hours.
Step 4: Set your booking rules and court prices
These settings control how guests and members book online: which lengths they can choose, when bookings can start, how far ahead they can book, and what they pay.
- In Settings, select Booking.
- Under Booking rules, choose your Booking lengths: 30 min, 60 min, 90 min, or 2 hr. You can pick more than one. 60 min is selected to start.
- Check the line Bookings start on the hour and half hour. To change it, select Change, choose On the hour or On the hour and half hour, then select Done.
- In Book up to [ ] days ahead, enter how many days ahead people can book. The default is 14.
- In Online booking closes [ ] before start, choose how close to start time online booking stops. The default is 1 hour.
- Under Pricing, enter your Club price per hour.
- In the pricing table, turn on the Public switch for each court you want bookable online. A shared court has two rows, one for tennis and one for pickleball, so you can open and price each sport separately.
- Select Save settings. You'll see Booking settings saved.
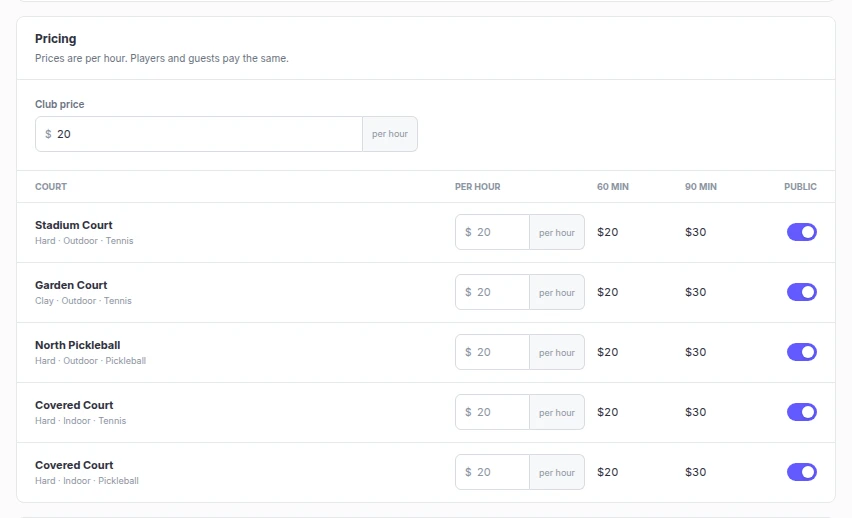
Note: These rules and prices apply to members who sign in and book, as well as to guests. Accept public bookings only controls guests, so leave it off until you're ready for non-members to book. See Set booking rules and rates.
Step 5: Invite your first member
Members need an invitation, or open signup, to log in and book. Tennisbook calls members "players" on screen. Invitations are off for new clubs, so turn them on first.
- Select Settings > Players.
- Turn on Player invitations. You'll see Settings saved.
- In the sidebar, select Players, then select Add player.
- Enter the member's Name and Email. Phone is optional.
- Check Send invitation. The button changes to Add and invite.
- Select Add and invite.
The member gets an email titled Book courts at your club name with an Accept invitation link. The link works for 7 days.
To bring on front desk staff, coaches, or another admin, use Settings > Users instead. See Invite members and staff.
Step 6: Book a test court
Now put a booking on the court sheet, the way your front desk will every day.
- In the sidebar, select Schedule.
- Select New, then Reservation. You can also select an empty slot on the court sheet.
- In the New reservation dialog, check the Court, Date, and time. Times move in 30-minute steps, and a new booking starts at 60 minutes long.
- If the court is shared, choose the Sport.
- Under Players, type in Search players and choose the member you just added. If someone isn't in Tennisbook yet, type their name and choose + Add "[name]" as a new player.
- Select Book court.
The booking appears on the court sheet.
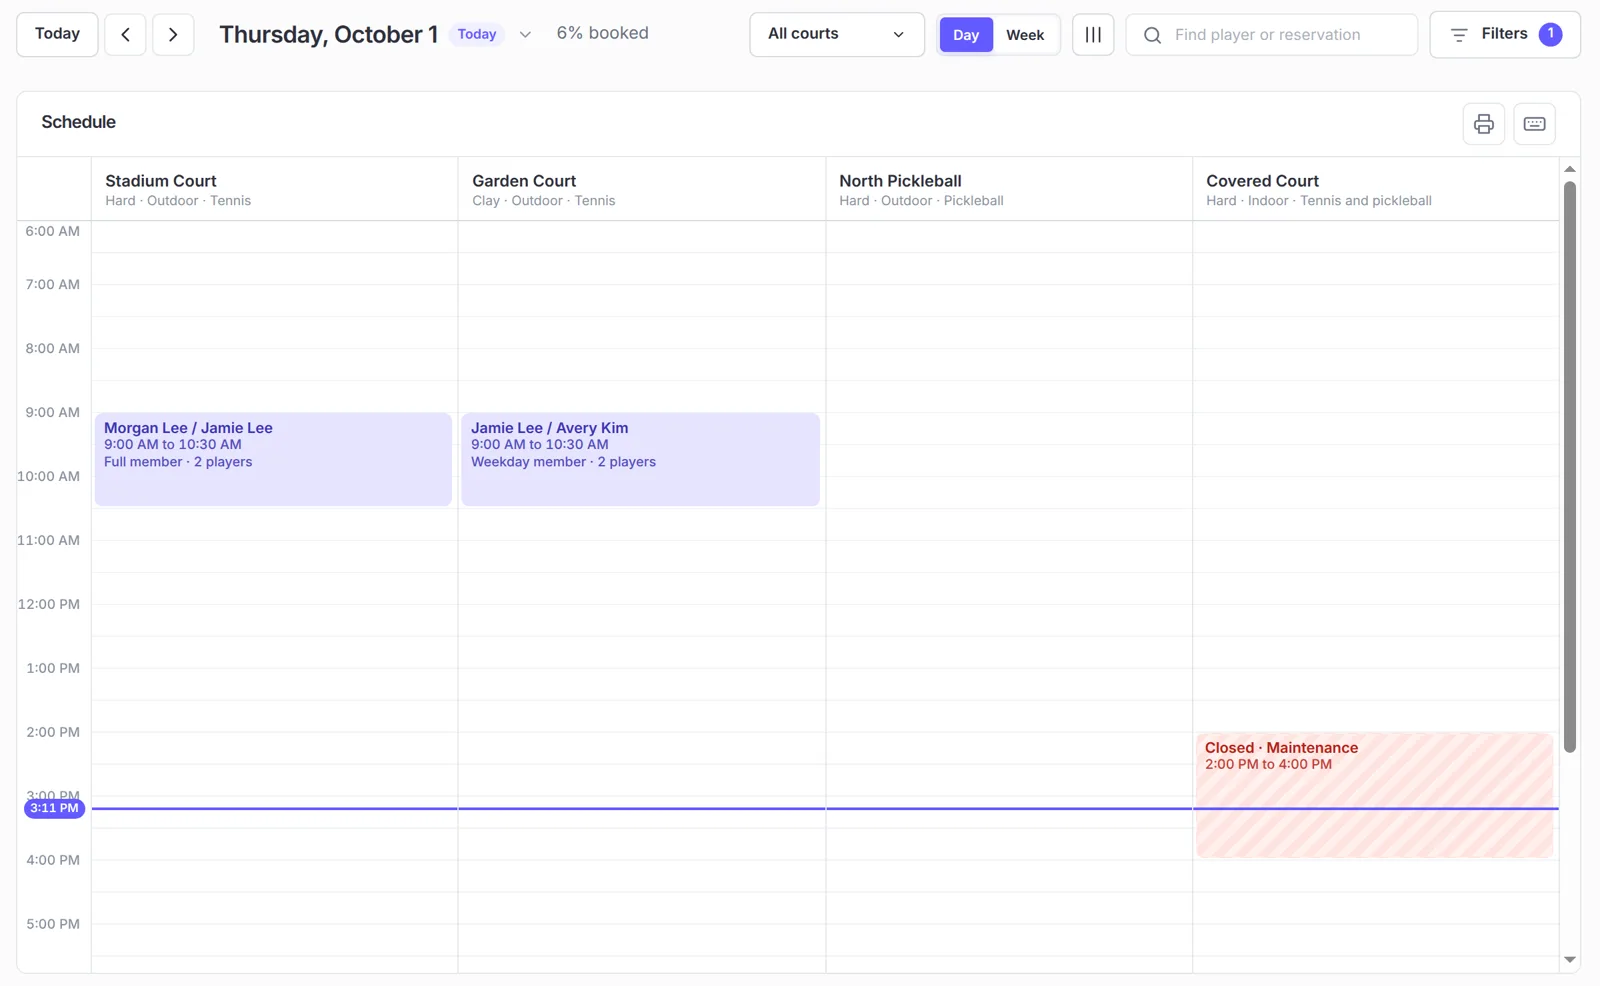
Note: Tennisbook doesn't collect payment for courts your staff book from the Schedule, and the prices from Settings > Booking don't apply. Charge for these at your desk the way you do today.
Tip: To clear the test booking, select it on the court sheet, then select the Cancel reservation icon. Choose a Reason such as Staff error and select Cancel reservation. A staff error is never charged a fee.
Before you open the doors
When your test booking looks right, work through these before you tell your members:
- Get paid online. Go to Settings > Payments and select Connect Stripe. Guests and members can't book online until your Stripe account shows Payments enabled. They pay your club through your own Stripe account. See Connect Stripe to take payments.
- Share your booking page. Turn on Accept public bookings in Settings > Booking and copy your Booking page link to your club website.
- Offer memberships. Create plans members can join and pay for online. See Create and publish a membership plan.
- Invite the rest of your members and staff.
- Choose a plan. When the trial ends, staff tools lock and members can't book online until you subscribe from Settings > Billing.
Next steps
- Add and configure courts: set up sections, shared tennis and pickleball courts, and retire courts.
- Set booking rules and rates: fine-tune lengths, notice, prices, and who can book.
- Invite members and staff: bring your whole club on board.
- Payments overview: see how money moves through Tennisbook.